UI Builder
Background
In the early stages of development we put a lot of focus on bettering the pipeline and tools for our team. While our first game in our in house engine Eggine, was built alongside the game, putting all our focus on the rendering pipeline and ECS structure, this time there was a lot of time put aside to prepare actual tools, and working on fixing the bottlenecks of our last project.
Since I had spent the majority of our last sprint in Spite completely rebuilding our UI using the new gold assets I was very tired of having to hard code the design, only to receive further instructions to move something slightly. A mature engine would naturally be bundled with a UI editor. So I took it upon myself to make a UI editor with the intention of making a familiar user experience for our graphics team.
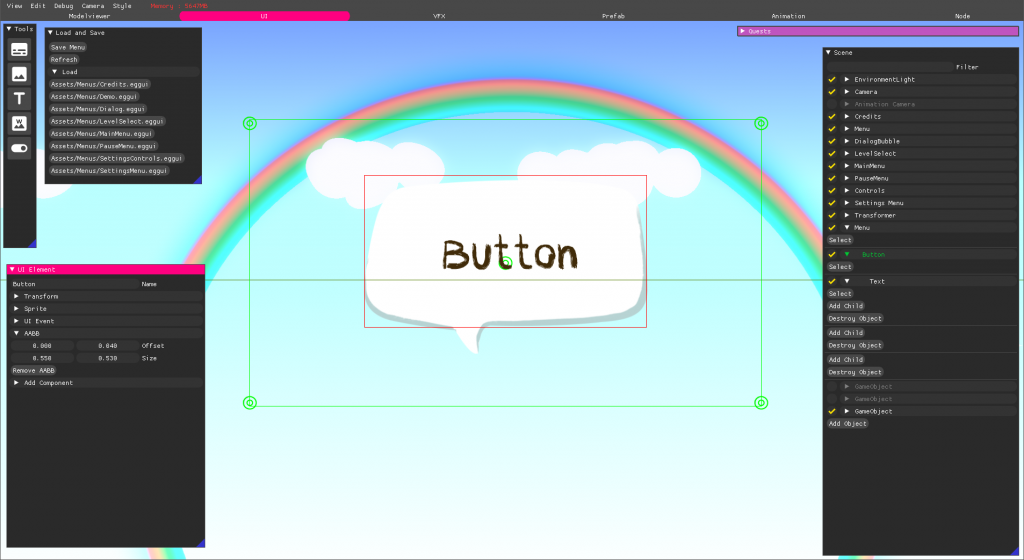
All UI elements are created using the toolbar which takes inspiration form classic photo editing software. It comes geared with Buttons, Images, Text, Wallpaper and Toggle Buttons, listed in this order.
Created UI Elements can easily be edited by using the same hierarchy as in a scene and using the inspector.
Some UI objects, like toggles and buttons come with new inspectors to handle UI event sending. I default some of the fields to help guide the user. The event component uses a simple observer pattern with an enum for type and an std::any for message which for most events in our game is casted to a string, and can thus be edited as such in the inspector.
And like expected saving and loading can easily be accessed from a simple menu. All files are saved the same way as our Eggfabs through binary serializing components and references to other entities. To load all menus and have them ready on start these menus are saved with the .eggui file ending for easy filtering.
Code Review
The UI Editor Loop
This is the main loop for the UI Editor. Is handles all the small popup windows and tools with ImGui.
This update loop also keeps track of when the transformer should be active.
The tool buttons are stored in an array and accessed using a small function. All creation functions for UI Elements are extracted.
There are lots of things I would love to go back and change up, like refactoring large chunks that can be separated into their own functions for better readability. Because of the short develop time for game projects at The Game Assembly, functionality is key. First make it work, if there’s time, make it right, and if you somehow have the chance to go back and put some finishing touches you should make the program fast. Since this is just a tool and is completely left out of the Retail builds there simply was not time to make things prettier. Having implemented it during School Raider I think a sign of quality is that it was mostly unchanged in the making of Blomstertid!
Transformer Update
The transformer is an object that holds a set of anchors which I have chosen to name handles, as they can be picked up by the cursor.
When moving a handle it affects its neighbours and then the new scale and position is calculated by using the distance between the handles and their pivot. To be resourceful it uses the same buttons as it is supposed to edit to work. This requires some tricks to make them move the right way and to not make the user lose grip of a handle if moving the cursor too fast. Since this code is not part of the Retail build the goal was to use whatever possible to make a smoother experience.
// This is a comment
What I learned
As with other tools we have built it has once again been proven that no matter how much effort you put into readability with tooltips and fancy icons, the team will always ask how to use something before trying it hands on, which is something that I will keep working towards overcoming!
Eggine Theme Editor
During my spare time I also tried to show some love to the style of our editors. All in game editors have been built using ImGui, so I decided to make an EditorStyles manager to allow the team to build and share their own themes for our application. This was mostly made for fun, but ended up improving the feel of our editor and has been greatly appreciated by some members in our team.
A color palette is created and can be referenced in all UI element types using an index. The color can then be tweaked by changing the alpha for each element.


